Hardness Testing Information Guide
This brief guide is intended to be a refresher for those a ready involved in hardness as well as a reference for first time users of hardness testers. Hardness is a characteristic of a material, not a fundamental physical property. It is defined as the resistance to indentation, and it is determined by measuring the permanent depth of the indentation. More simply put, when using a fixed force (load)* and a given indenter, the smaller the indentation, the harder the material. Indentation hardness value is obtained by measuring the depth or the area of the indentation using one of over 12 different test methods.
Section 2: Test
Method Principles
ROCKWELL METHOD
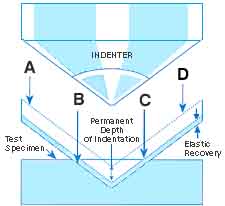
The Rockwell principle measures permanent depth of indentation produced by the preliminary and total test forces. First, a preliminary test force (pre-load or minor load) is applied. This is the zero or reference position. Then, an additional test force (or major load) is applied to reach the total required test force. This additional force is held for a predetermined amount of time and then released, but with the preliminary test force still applied. The indenter reaches the final position at the preliminary force and the distance traveled from the major load position is measured and converted to a hardness number. Preliminary test forces range from 3 (superficial Rockwell) to 10 kilograms (regular Rockwell) to 200 kilograms (macro Rockwell scale). Total test forces range from 500 grams (micro) to 15 through 150 kilograms (superficial & regular) to 500 through 3000 kilograms (macro).
For a more complete description
of the Rockwell test method and testers see Rockwell
Hardness Testing

A. Depth reached by indenter after application of preliminary test force (minor load).
B. Position of indenter under total test force.
C. Final position reached by indenter after elastic recovery of the material.
D. Position at which measurement is taken.
BRINELL METHOD
Widely used on castings and
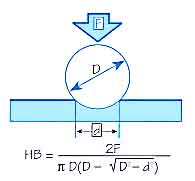
forgings, the Brinell method applies a predetermined test force (F) to
a hard steel or carbide ball of fixed diameter (D) which is held for a
predetermined time and then removed. The resulting indentation is measured
across at at least two diameters - usually at right angles to each other
and averaged (d). A chart is then used to convert the averaged diameter
measurements to a Brinell hardness number. Test forces range from 500
to 3000 kilograms.
For a more complete description of the Brinell test method and Newage
testers see Brinell Hardness Testing

Brinell Measurement
Calculation
D = ball diameter
d = impression diameter
F = load
HB = Brinell Result
VICKERS AND KNOOP METHODS
Mostly used for small parts,
thin sections, or case depth work, Vickers and Knoop methods are based
on an optical measurement system. The new Computer Assisted Measurement
System (C.A.M.S.), now available from Newage
Testing Instruments, Inc.,
has improved productivity, accuracy and repeatability of these labor intensive
methods. (See pages 14 and 15). To perform a test, a predetermined test
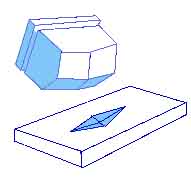
force is applied with a pyramidal shaped diamond indenter. After a dwelt
time, the force is removed. Then, in the Vickers method, the indentation
length of vertical and horizontal axis is measured and averaged. In the
Knoop method, only the tong axis is measured (Figure 5). A chart is used
to convert the measurements to corresponding Vickers or Knoop hardness
numbers, Test forces range from 1 to 2000 grams, Vickers does offer higher
force capabilities - up to 150 kgs - but are not used frequently in North
America.
For a more complete description of the Rockwell test method and Newage
testers see Microhardness Testing

Vickers Test
Opposing
indenter faces are set at a 136 degree angle to each other

Knoop Test
Long side faces are set at a 172 degree, 30 minute angle to each
other. Short side faces are set at a 130 degree angle to each
other
DUROMETER & IRHD METHODS
Widely used in the plastics and rubber industries, the Durometer method (sometimes erroneously referred to as the Shore® method after the company that originally developed the test.) has evolved from a coarse handheld measurement to today's repeatable test method. Bench model testers can now read to a tenth of a point with good repeatability. The Durometer method applies a predetermined test force to a spherical or conical shaped indenter. The depth of indentation is translated into a hardness value by means of a dial gage or electronically. Test forces range from 822 grams (A scale) to 4550 grams (D scale). Non-standardized "micro" scales are also available from many manufacturers. These scales permit testing on thinner and more narrow specimens.
The use of IRHD, or International
Rubber Hardness Degrees, has increased considerably in North America since
its origin in Europe. It provides a very repeatable result on rubber parts
of all shapes and sizes. It is especially important in the determination
of the hardness of rubber O-rings. The method employs a preliminary test
force that is applied to the specimen through the indenter. The test is
zeroed at this position, then the total test force is applied. The distance
between the these two forces is then measured and converted to an IRHD
hardness value. Preliminary test forces are 8.46 grams for micro scales
and 295.74 grams for regular scales. Total test forces are 15.7g for micro
and 597 for regular scales.
Shore® is a
registered trademark of Instron Corporation
How to Read a Hardness
Number
|
Scale Name
|
Sample
Report
|
Explanation
|
| Rockwell Scale | 60 HRC | Hardness Rockwell "C" scale with a "60" test value |
| 80 HR15N | Hardness Rockwell "15N" scale with a "80" test value | |
| Brinell Scale | 200 HBS10/3000/15 | "200" test value using a steel (HBS) ball of 10 mm diameter a 300 kg load and a 15 second dwell |
| 500 HBW 1/30/20 | "500" test value using a Tungsten (HBW) ball of 1mm diameter with 30 kg load and 20 second dwell | |
| HB 200 | An informal report assuming 10 mm steel ball, 3000 kg load and "200" test result value | |
| Microhardness | 200 HV 500/15 | "200" test value with Vickers 500 g load, 15 seconds duration |
| 200 HK 500/15 | "200" test value with Knoop 500 g load, 15 seconds duration | |
| Durometer | A/50/15 | Durometer type A with "50" test value result and 15 second duration |
| D/50/15 | Durometer type D with "50" test value result and 15 second duration | |