Hardness Testing Information Guide
This brief guide is intended to be a refresher for those a ready involved in hardness as well as a reference for first time users of hardness testers. Hardness is a characteristic of a material, not a fundamental physical property. It is defined as the resistance to indentation, and it is determined by measuring the permanent depth of the indentation. More simply put, when using a fixed force (load)* and a given indenter, the smaller the indentation, the harder the material. Indentation hardness value is obtained by measuring the depth or the area of the indentation using one of over 12 different test methods.
Section 1: General Considerations for Hardness Testing.
LARGE PARTS - Parts that either overhang the anvil or are not easily supported on the anvil should be clamped into place or properly supported.
SMALL PARTS - The smaller the part the lighter the load needed. Be sure to meet minimum thickness requirements and properly space indentations away from inside and outside edges.
CYLINDRICAL TESTING (See at right) - A correction to a test result is needed when testing on small diameters cylinder shapes due to a difference between axial and radial material flow. (Refer to ASTM round correction charts for Rockwell scale testing).
SPACE INDENTATIONS
- Maintain a spacing equal to 2~1/2 times the indentation's diameter from
an edge or another indentation.

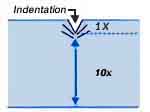
THICKNESS REQUIREMENTS (See at right) - Maintain material thickness at least 10 times the indentation depth. (Refer to ASTM minimum thickness charts for Rockwell scale testing ).
SPACE INDENTATIONS - Maintain a spacing equal to 2~1/2 times the indentation's diameter from an edge or another indentation.
SCALE CONVERSIONS
- Sometimes it is necessary to test in one scale and report in another
scale. Conversions have been established that have some validity, but
it is important to note that unless an actual correlation has been completed
by testing in different scales, established conversions may or may not
provide reliable information. (Refer to ASTM scale conversion charts for
non-austenitic metals in the high
hardness range and low hardness
range.) Also refer to ASTM standard E140 for more scale conversion
information.

GAGE R&R STUDIES. - Gage Repeatability and Reproducibility Studies were developed to calculate the ability of operators and their instruments to test according within the tolerances of a given test piece. In hardness testing there are inherent variables that preclude using standard gage R&R procedures and formulas with actual test pieces. Material variation and the inability to retest the same area on depth measuring testers are two significant factors that affect GR&R results. In order to minimize these effects, it is best to do the study on highly consistent test blocks in order to minimize these built-in variations.
Newage Testing Instruments hardness testers operate very well in these studies. Unfortunately, since these studies can only be effectively done on test blocks, their value does not necessarily translate into actual testing operations. there are a host of factors that can be introduced when testing under real conditions. Some Newage testers excel at testing in real-world conditions by reducing the effects of vibration, operator influence, part deflection due to dirt, scale, a specimen flexing under load.
For further details on how to conduct a proper hardness tester GR&R ask for Tech Sheet 99.