#1LOGOSIZEDCOLORED
 StressTel
 Fast Gauge Info
 Thickness
 Flaw Detector
 Transducers
 Bolting
 Service
 Contact Us
 Year 2000


 TM1-CDL

[Features][Display][Description][Material][Power Supply][Operation]
[Transducer][Warranty]

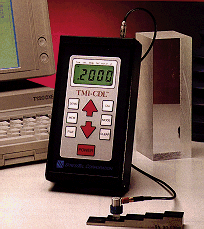
tm1cdlpicture

Unit Features

The StressTel TM1-CDL measures thickness of precision machined and formed metal and plastic components. The TM1-CDL has a measurement range of 0.010 inches to 15.00 inches in metals and 0.005 inch minimum in plastic. The TM1-CDL is compatible with a wide variety of transducers for optimum measurement performance.

The TM1-CDL has an on-board data logger for storage of 1,200 readings in 99 individual data files. Readings can be sent directly to a printer or downloaded to a PC with supplied software.

Other key TM1-CDL features include a large backlit LCD display; durable metal housing; weather resistant keypad; Hi/Lo alarm limits with flashing annuciator; DIFF function to display the positive or negative difference between the thickness measurement and preset value and a data logger.

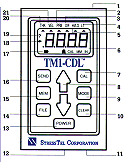
1.

Lemo quick disconnect connector.

2.

PRB carat lights when unit in probe selection mode.

3.

DIF carat lights when unit in differential measurement mode.

4.

LT carat lights when display backlight control mode is enabled.

5.

HI/LO carat lights when unit in the Hi/Lo tolerance limits and alarm set-up modes.

6.

Backlit display.

7.

Activates arrow keys to set values in THK, VEL, DIF, HI/LO, PRB, and LT modes.

8.

Arrow keys.

9.

Selects operating mode:  THK, VEL, DIF HI/LO, PRB, and LT.

10.

Clears display and erases/resets memory of on-board data logger.

11.

Serial RS 232 port.

12.

Built-in auto-probe zero block.

13.

Power key.

14.

Select file and number of files.

15.

Select file of on-board data logger.

16.

Sends data in memory to compatible computer/printer.

17.

Low battery indicator.

18.

Indicates displayed reading outside tolerance limit.

19.

Over range indicator.

20.

THK carat lights when unit in normal thickness measurement mode.

tm1cdldrawing

Display

Measurements:

4-digit backlight LCD.

Coupling Check:

NO ECHO LCD display.

Battery Check:

LOW BAT LCD display.

Units:

English/Metric selectable
IN or MM displayed

Description

Unit Size:

3.5 inches wide (89 mm)
6.25 inches long (159 mm)
1.5 inches deep (38 mm)
14.5 oz. (411 grams)

Case:

Weather-resistant, aluminum.

Keyboard:

Sealed keypad.

Auto Shut-off:

After 3.5 minutes of non-use.

Data Logger:

Data Logger Memory Capability:

1,200 readings in 99 user defined files.

Data Output Port:

Serial: asynchronous 0 +5V
TTL: 8 bit 1 stop bit, 1200 baud
RS 232C: Bipolar logic levels provided by serial PC and
               printer cables.
SPC:  Standard Mitutoyo interface

Material

One step calibration for steels, metals, glass and plastics.

Power Supply

Four "AA" Alkaline batteries.
Operating time of 40 hours at 25% duty cycle.

Operation

Measuring Range:

Metals - 0.010 to 15.000 (0.25 mm to 380 mm)
Plastics - 0.005 (0.13 mm) minimum

Display Resolution:

0.0001 inches (0.01 mm)

Sound Velocity Range:

0.200 in. to 0.550 in. per micro-second

Allowable Surface Temperature Range:

0º F to 130º F.

Transducer

Cable:

4 foot environment protected.

Description:

15 MHz, 0.25 inch active element diameter.

Connection:

Lemo quick-disconnect.

Configuration:

Single-element delay tip probe.

TM1-CDL Kit Contents

*

TM1-CDL Ultrasonic Thickness Gauge.

*

1/4" x 5 MHz Transducer (style user selectable from list).

*

Lemo-MD Transducer Cable.

*

Operation Manual.

*

TM1-CDL Program Disk.

*

RS 232 Cable.

*

Screwdriver.

*

Couplant.

*

Four "AA" Alkaline Batteries.

*

Plastic Instrument Accessory Case.

*

Certificate of Calibration.

Warranty

All precision thickness gauges have a full two-year warranty on parts and labor excluding batteries, transducer and cable. Specifications subject to change without notice.